Code Brain | Building the Simplest Agent Application on Dify with ByteDance's Doubao Model: AI Information Retrieval


Recently, ByteDance officially launched the Doubao large language model at the Volcano Engine Force Conference. According to the company, Doubao currently processes 120 billion tokens of text daily and generates 30 million images. Its flagship model is priced 99.3% lower than industry averages. Doubao was among the first domestic models to pass algorithm registration, and has become one of the most widely used and broadly applied large models in China.
In this article, we'll discuss how to use ByteDance's latest Doubao model on Dify to quickly build a simple agent capable of understanding requirements, autonomous planning, and self-selecting tool usage.
Dify's agent features are still under active development. Creating an app that supports complex "CRUD" operations may require waiting for this community issue to be resolved ([2]). But if our use case involves reading large volumes of data and then synthesizing it, things get much simpler. We can quickly turn "data APIs" into Dify tool services, then let the large model choose which to use based on actual user needs. All code referenced in this article is open-sourced at soulteary/dify-with-ai-agent ([3]). Original article: Using ByteDance's Doubao Model to Build the Simplest Agent App on Dify (Part 4): AI Information Retrieval
Author: Yang Su
Doubao
News about ByteDance's new Doubao model has been circulating in several group chats lately. What started as technical discussion quickly devolved into price debates. Personally, I think in these early days of the technology, it's more important to focus on how the model actually performs and how to use it well.
Last week a friend asked if I could test Doubao in a business scenario. When I discovered that trials were enterprise-only, I reached out to a contact at Volcano Engine and got this response:
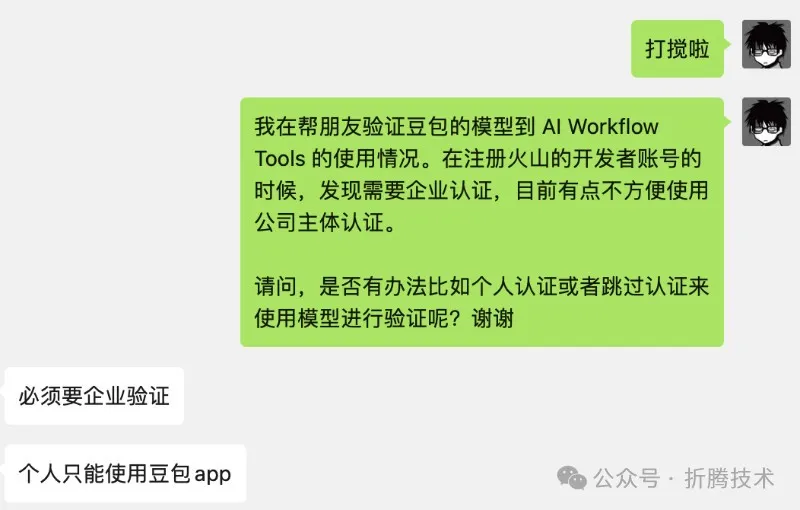
Looks like individual developers won't have access anytime soon
So I had to pause that test.
Then this week, a friend said their enterprise verification had been approved, and suggested we try configuring it in Dify. So here we are.
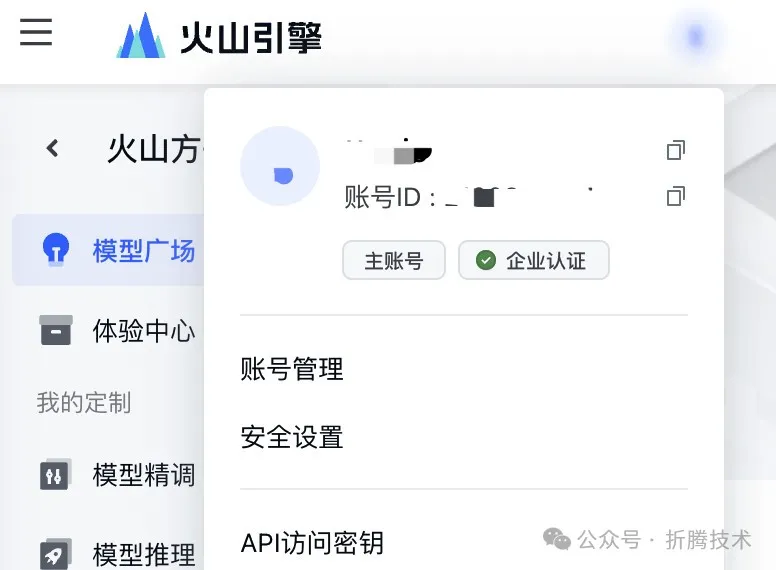
Looks like we can give it a shot
Let's get started.
Preparation
Aside from the model itself, the setup process in this article is identical to the previous one. If you've already worked through that article, you only need to learn how to activate the Doubao model service.
The complete preparation involves: setting up Docker, launching Dify, launching the Meilisearch search engine and preparing data for it to index, and preparing the model service.
If you prefer not to use Doubao, you can substitute any other model. The only difference will be in execution results, which may vary based on model capabilities and stylistic preferences.
As before, reproduction is straightforward — if you have Docker installed, it will save you considerable hassle.
Docker Environment
For smooth sailing, I recommend installing Docker. Whether or not your machine has a GPU, you can follow these two guides based on your OS of choice: Docker-Based Deep Learning Environment: Windows Edition ([4]) and Docker-Based Deep Learning Environment: Getting Started ([5]). And of course, once you're using Docker, you can do much more — I've written dozens of Docker tutorials ([6]), but I won't digress here.
Quick-Starting Dify with Docker
You can refer to either of these for one-click Dify deployment:
- "Quickly Configuring and Launching Dify" from Using Dify and AWS Bedrock to Play with Anthropic Claude 3 ([7])
- "Optimized Dify Docker Configuration" from Using Dify and Moonshot API to Build Your AI Workflow (Part 1): Making Non-AI Apps AI-Powered ([8])
The only thing to note: update the Dify Docker image versions mentioned in those articles to 0.6.8:
- langgenius/dify-web:0.6.8
- langgenius/dify-api:0.6.8
One-Click Meilisearch Deployment with Docker
Meilisearch-related content — including out-of-the-box configuration and one-click Docker search engine deployment — is straightforward but lengthy, so I won't expand on it here. Refer to the previous article for the complete process.
Activating Doubao
Once everything above is ready, let's initialize Doubao. The current entry point and model parameters are somewhat hidden, so I'll walk through the necessary details.
First, let's see how to activate the Doubao model API service. The full process resembles AWS Bedrock or Azure OpenAI platform setup. If you've worked with Anthropic or OpenAI cloud deployments before, this should feel familiar.
If you've previously used Volcano Ark, visiting ByteDance's ML MaaS cloud console ([9]) might show you a "strange" model list:
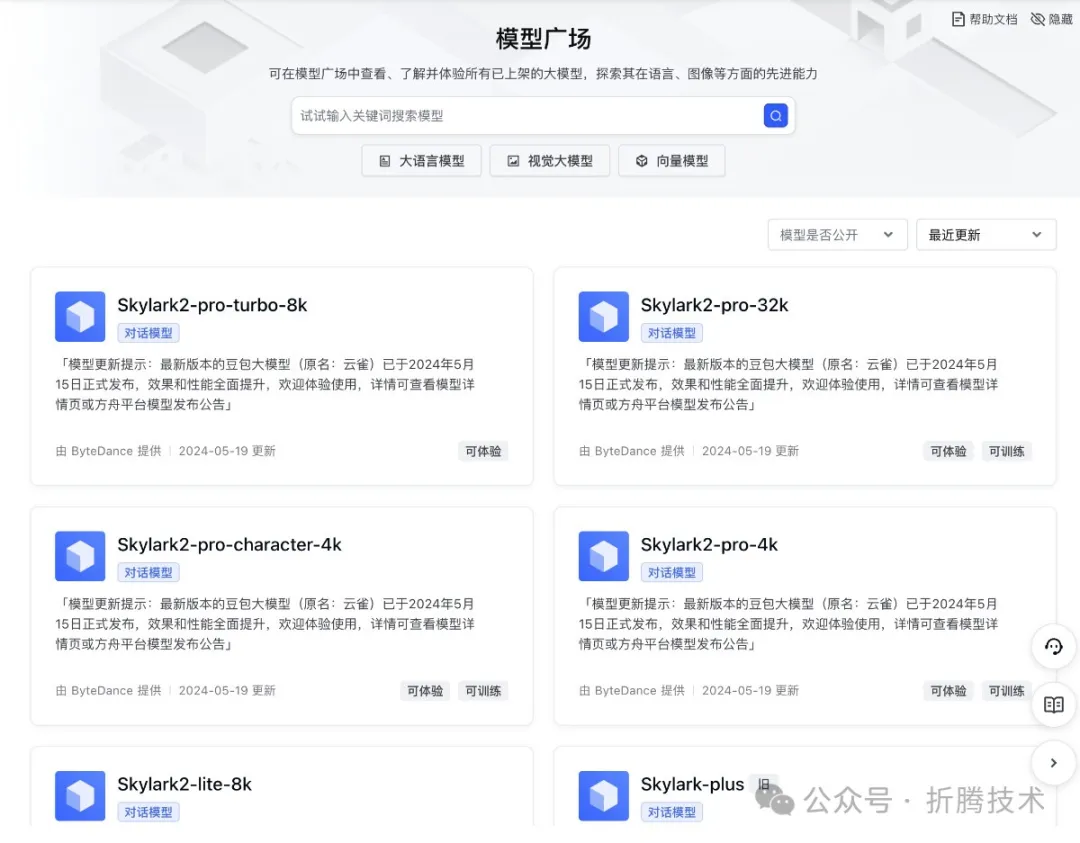
ByteDance Volcano Ark legacy console
That's because the recently promoted Doubao models are actually hosted on the new ByteDance Volcano Ark 2.0 ARK service cloud console ([10]). Visiting the new console address reveals an interface with C-end-consistent design language, along with the new model versions we want to use:
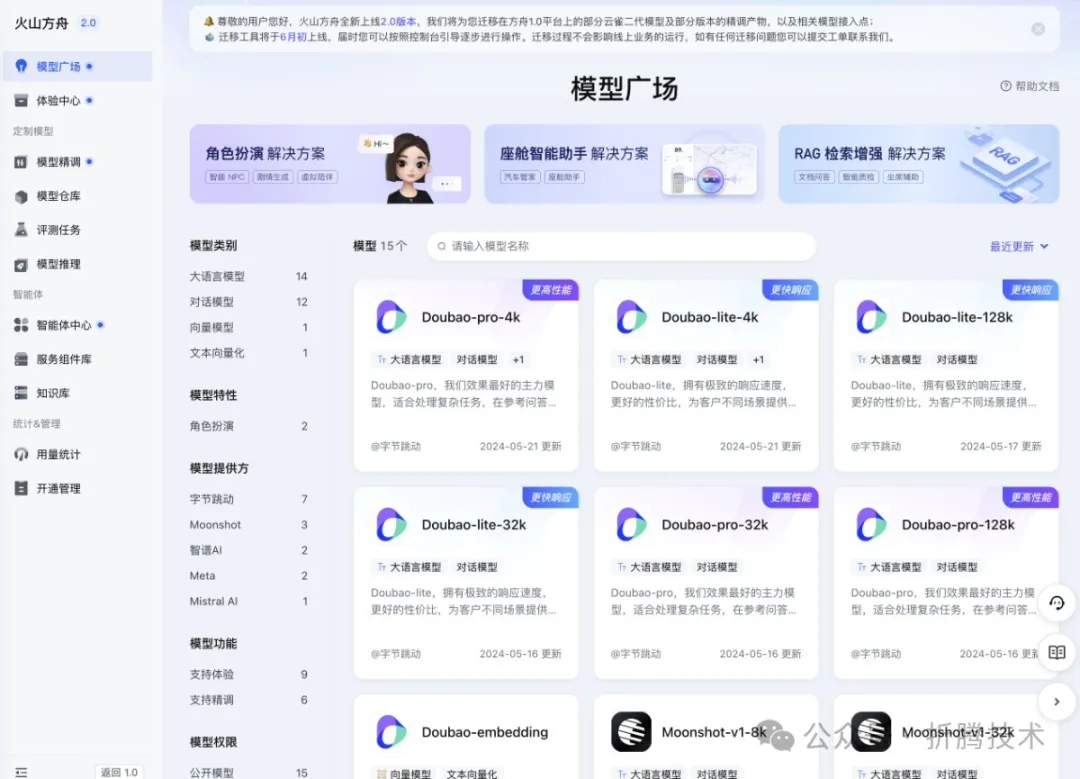
ByteDance Volcano Ark new console
Click "Activation Management" in the left sidebar to see the available models: six new Doubao LLMs, one Embedding model for vector retrieval, and three Moonshot AI models.
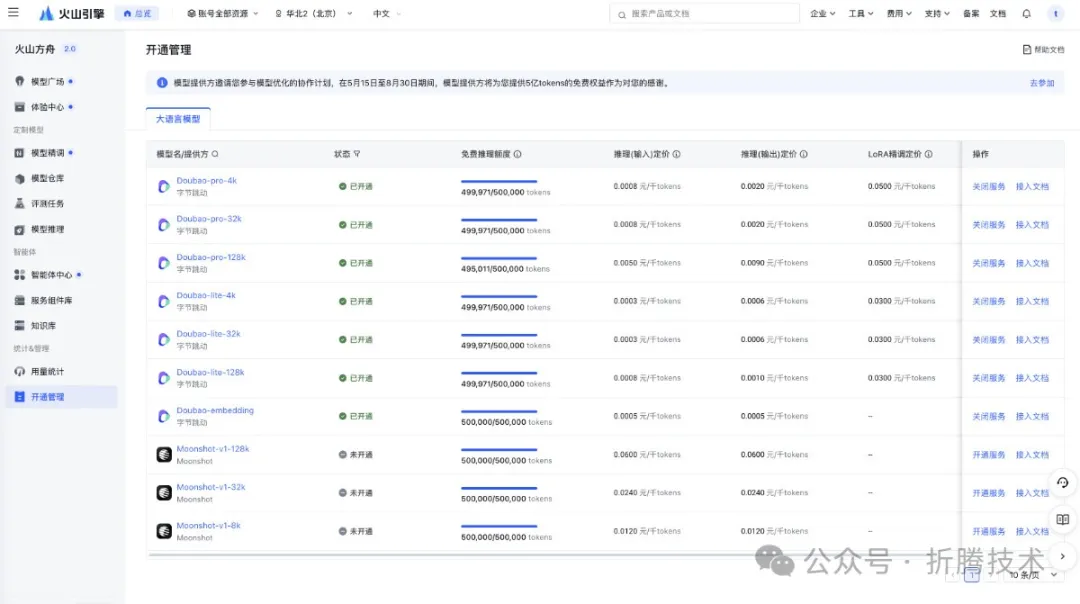
First batch of available models. Based on your needs, click the "Activate" button on the right to reach the confirmation page.
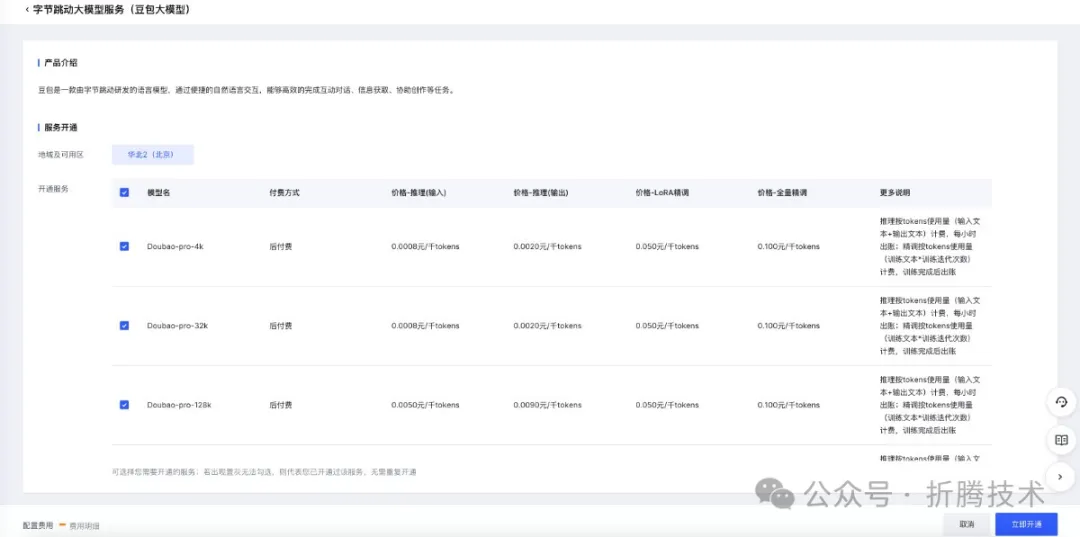
Confirm which model services to activate. Once confirmed, we can start leveraging the models as described above.
Configuring Doubao in Dify
The current Doubao MaaS platform isn't fully polished yet, so I recommend following the steps below carefully to avoid getting lost.
To use Doubao as the driving model for an agent, we first need to create a Doubao model service instance and complete deployment in Dify.
Open the Volcano Engine key management page ([11]) and create an "API key pair" for calling cloud resources — we'll use this shortly.
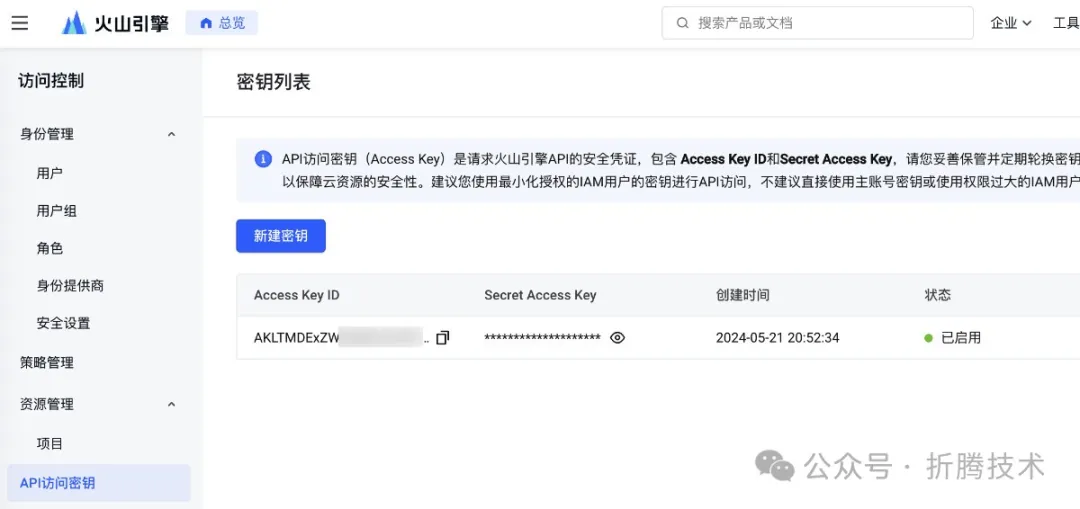
Create an API key pair
Next, open the Volcano Engine Ark 2.0 model inference page ([12]) and click "Create Inference Endpoint" to begin the model instance creation process:
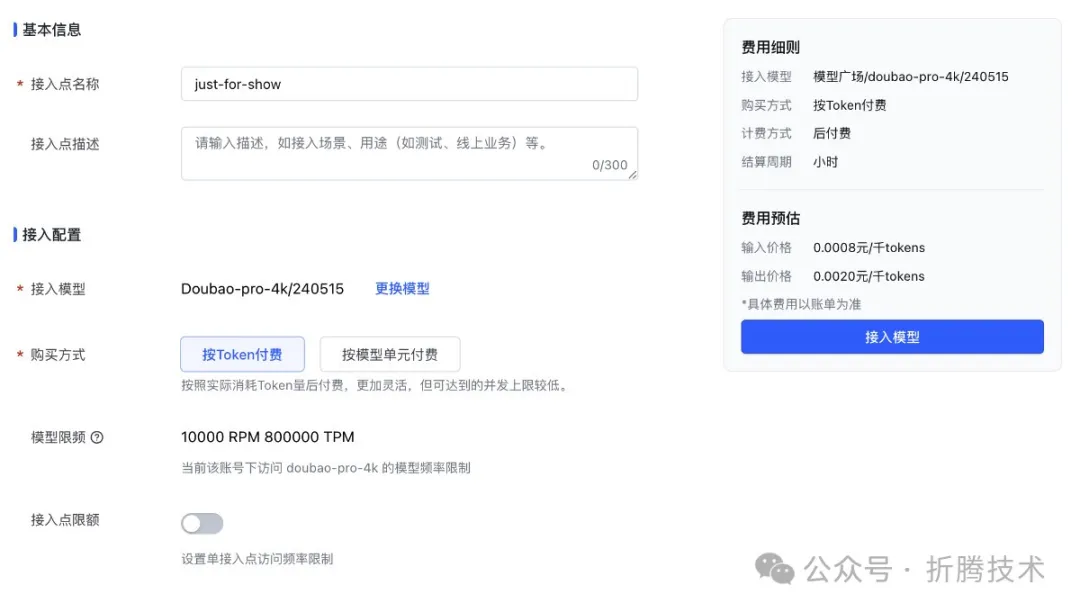
Create Model Instance
You can name the inference endpoint whatever you want — it's mainly for display purposes. As for rate limiting, Volcano Engine's product managers have clearly heard the urban legend about "using 2G/3G/4G/5G overnight and waking up to a massive bill," so they've given users a way to "slow down" their model usage. Click on model selection to open the specific model list:
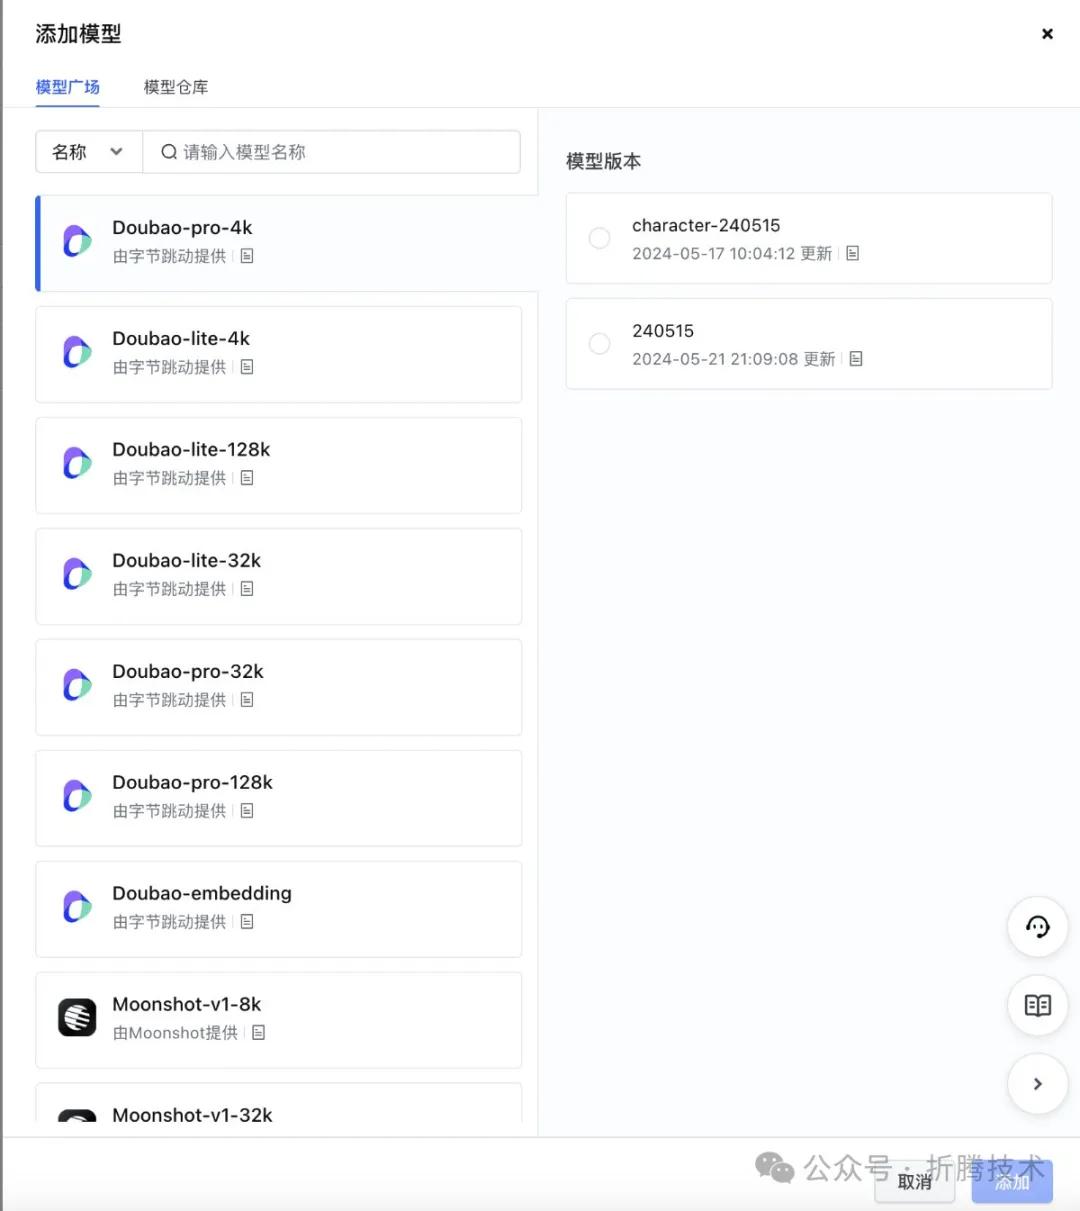
Select the model instance to create
Once you've selected the model you want to create, click "Create Inference Endpoint" and you'll see your newly created model instance. Find the "ep-2024xxxxxxxx" string below your instance's endpoint name and save it — we'll need this shortly too.
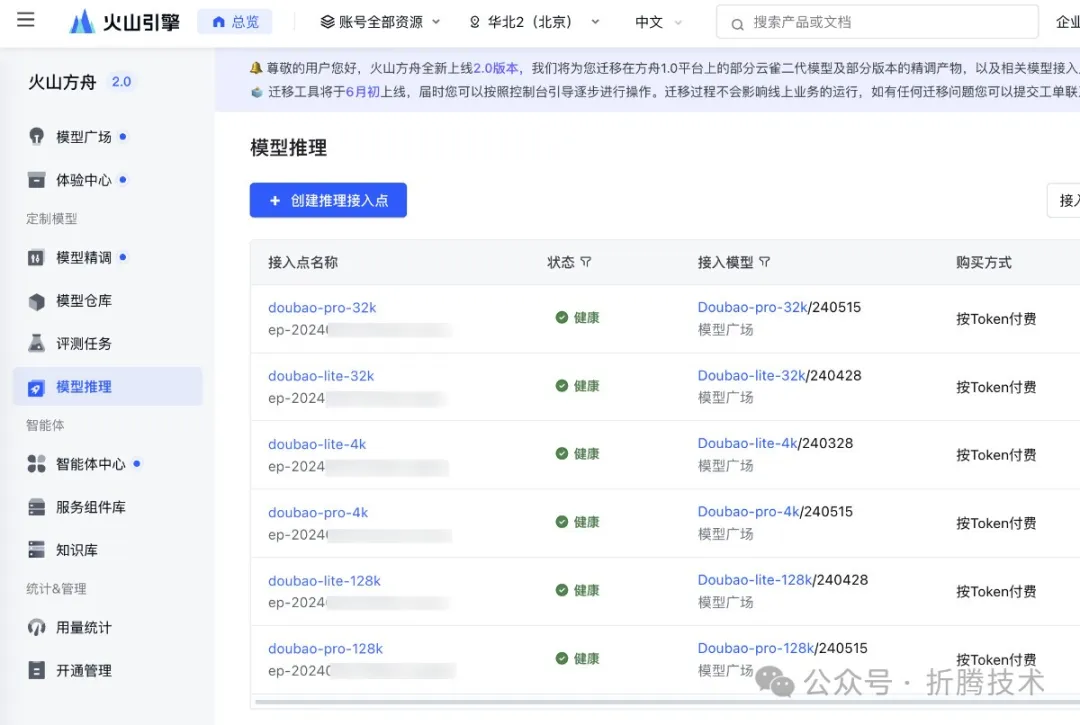
Created model list (you can create multiple)
Finally, let's collect the last piece: the model context parameters. Open the Ark 2.0 model playground [13], check the model instance you just created, then open the parameter settings to get the specific model parameters (shown as 128K in the image):
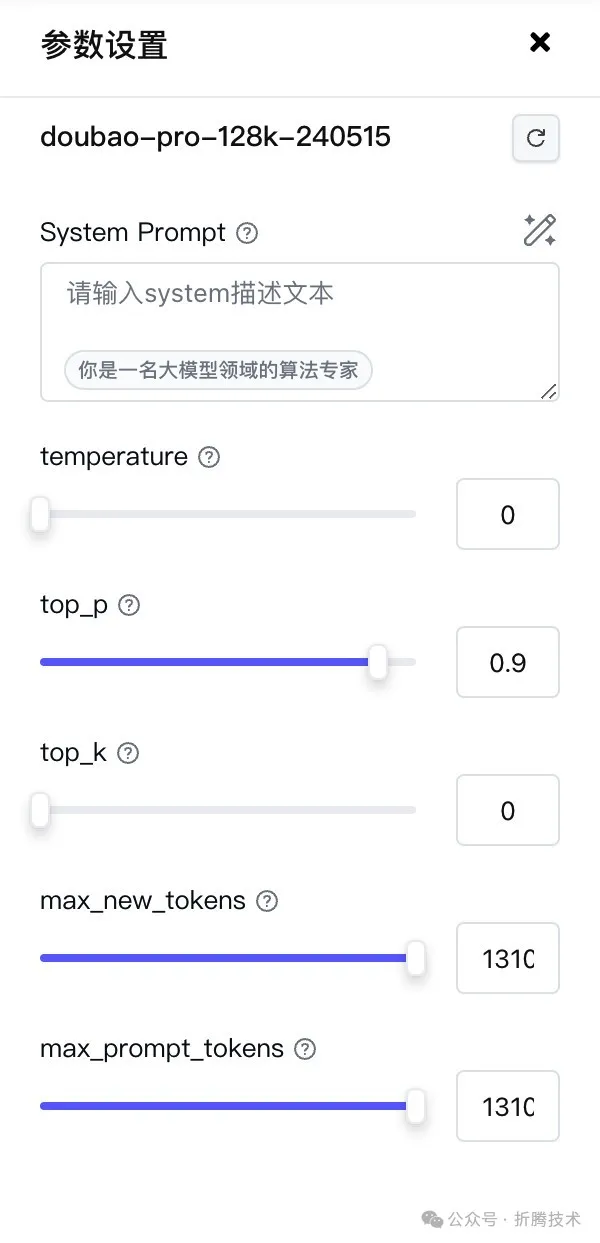
The actual model parameter value is at the bottom
Now we can open the Dify interface and start configuring the model backend. Click your user avatar in the top-right corner of Dify, select "Settings" from the dropdown, then choose "Volcano Engine" from the "Model Providers" section in the left sidebar of the settings window. Click "Add Model."
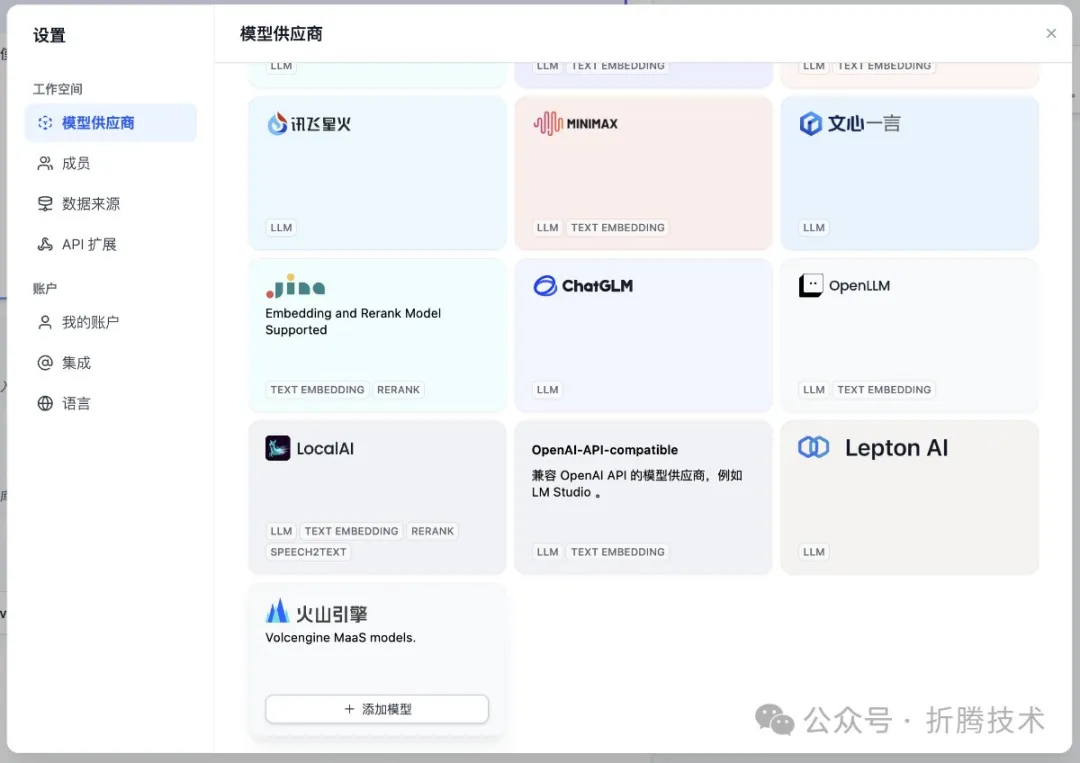
Find the Volcano Engine model backend in Dify
In the model settings dialog that pops up, fill in the "API key pair" and "model endpoint ID" we gathered earlier (leave everything else as default):
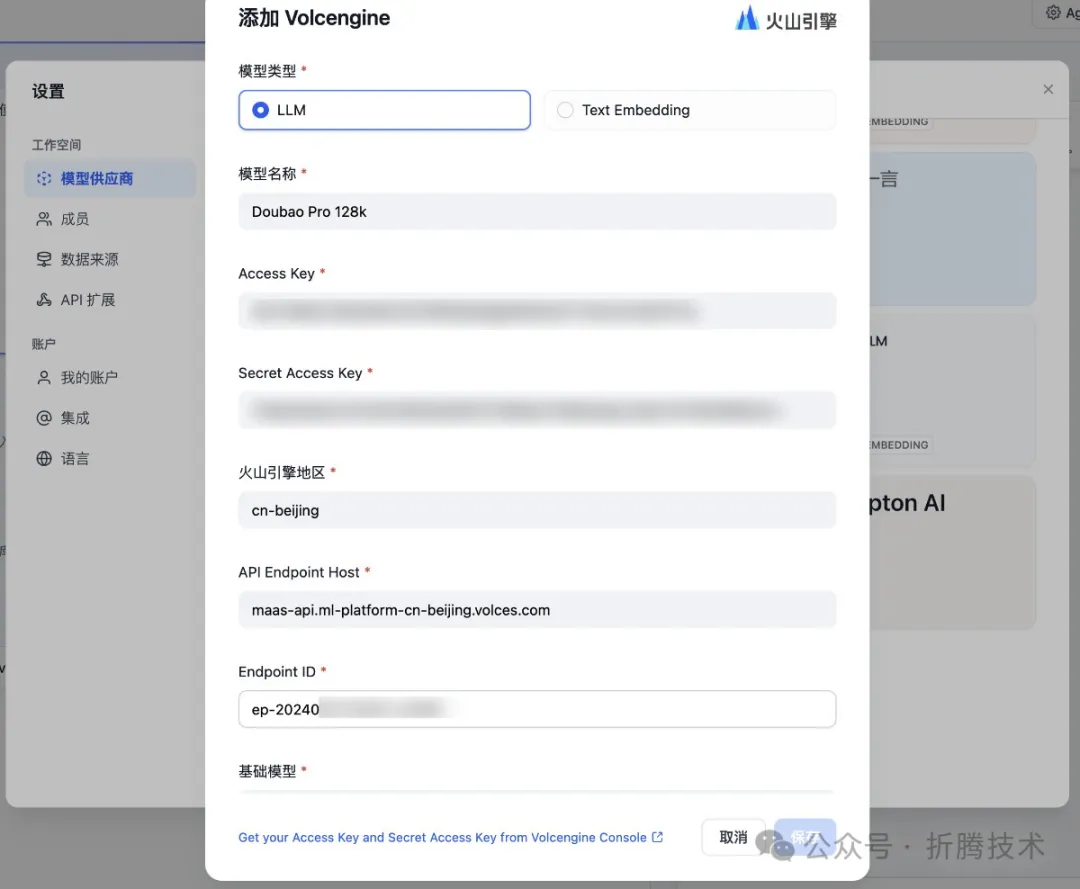
Find the Volcano Engine model backend in Dify
Next, set "Model Type" to Custom, and set the context length to the specific value we found on the parameters page (you can also set it lower based on your needs, even if you're using a large-context model):
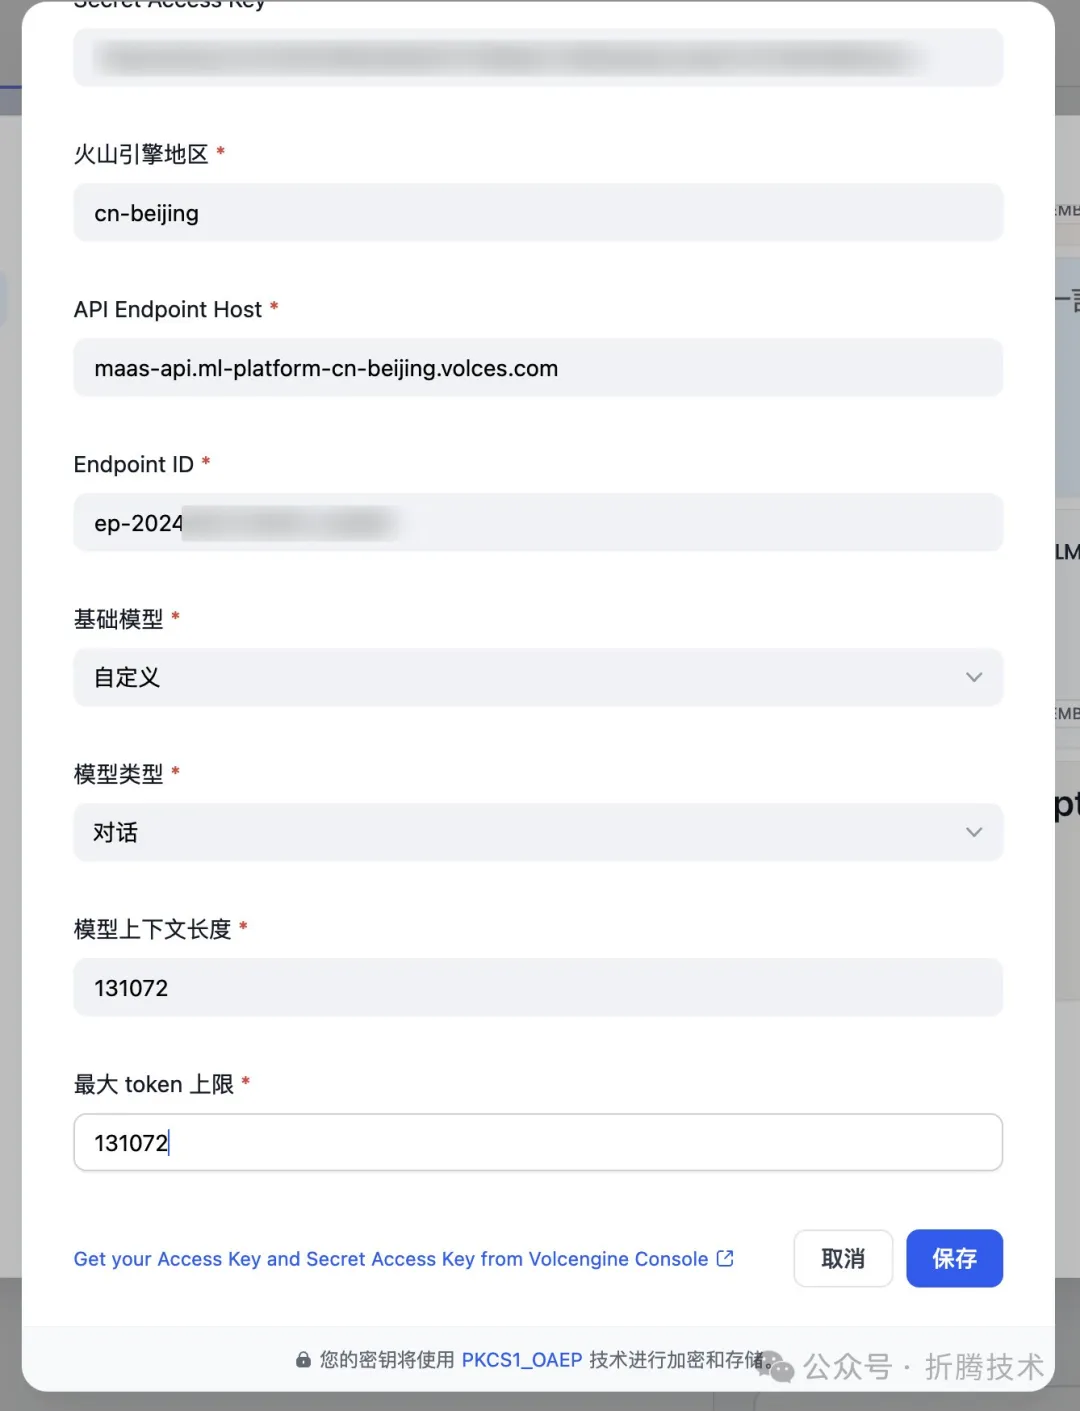
Find the Volcano Engine model backend in Dify
Click Save, and the "Doubao Model Engine" will appear in your available model list.
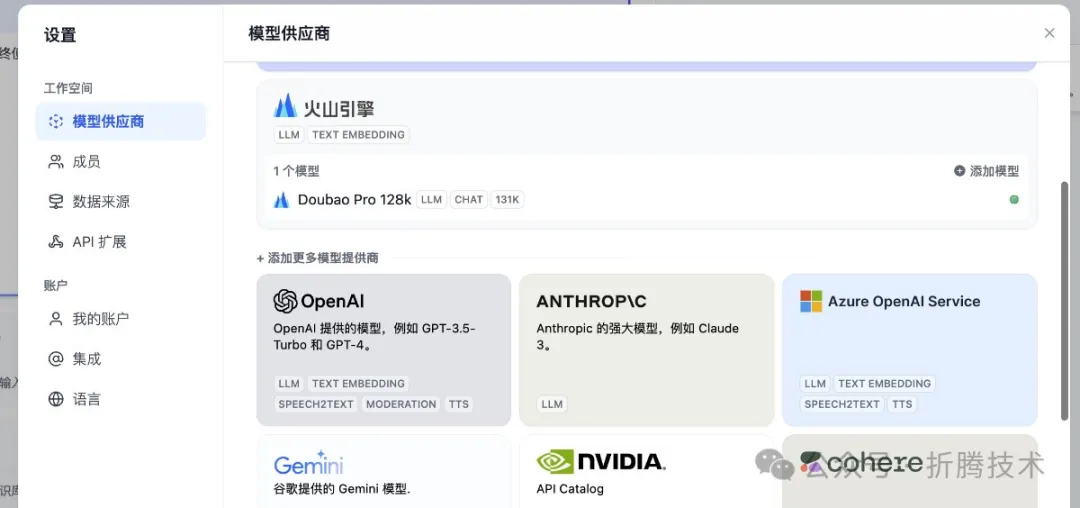
Volcano Engine model backend ready
2
"Creating a Dify AI Agent Application"
On the homepage, click "Create Blank App," then select "Agent" as the application type in the popup window. Fill in your preferred app name and description:
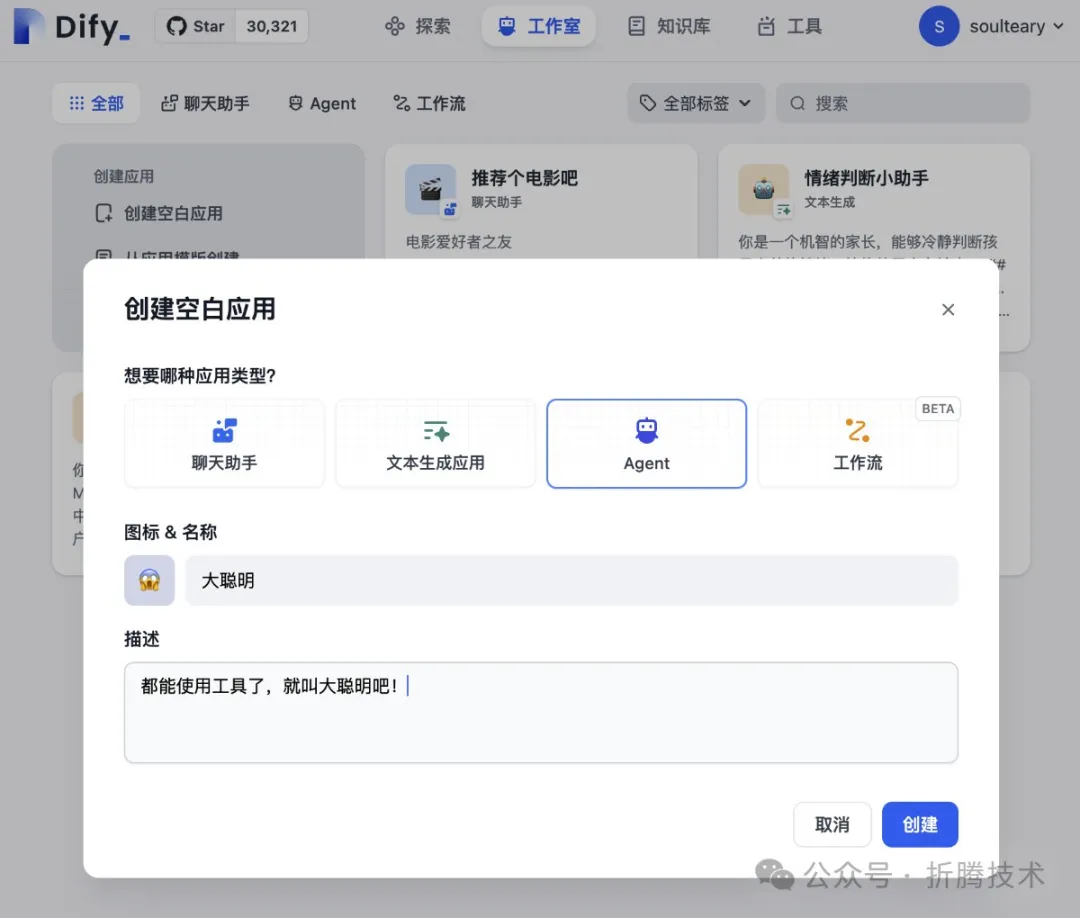
Create AI Agent
Select the model you want to use from the model list on the right — for example, the Doubao model we just added:
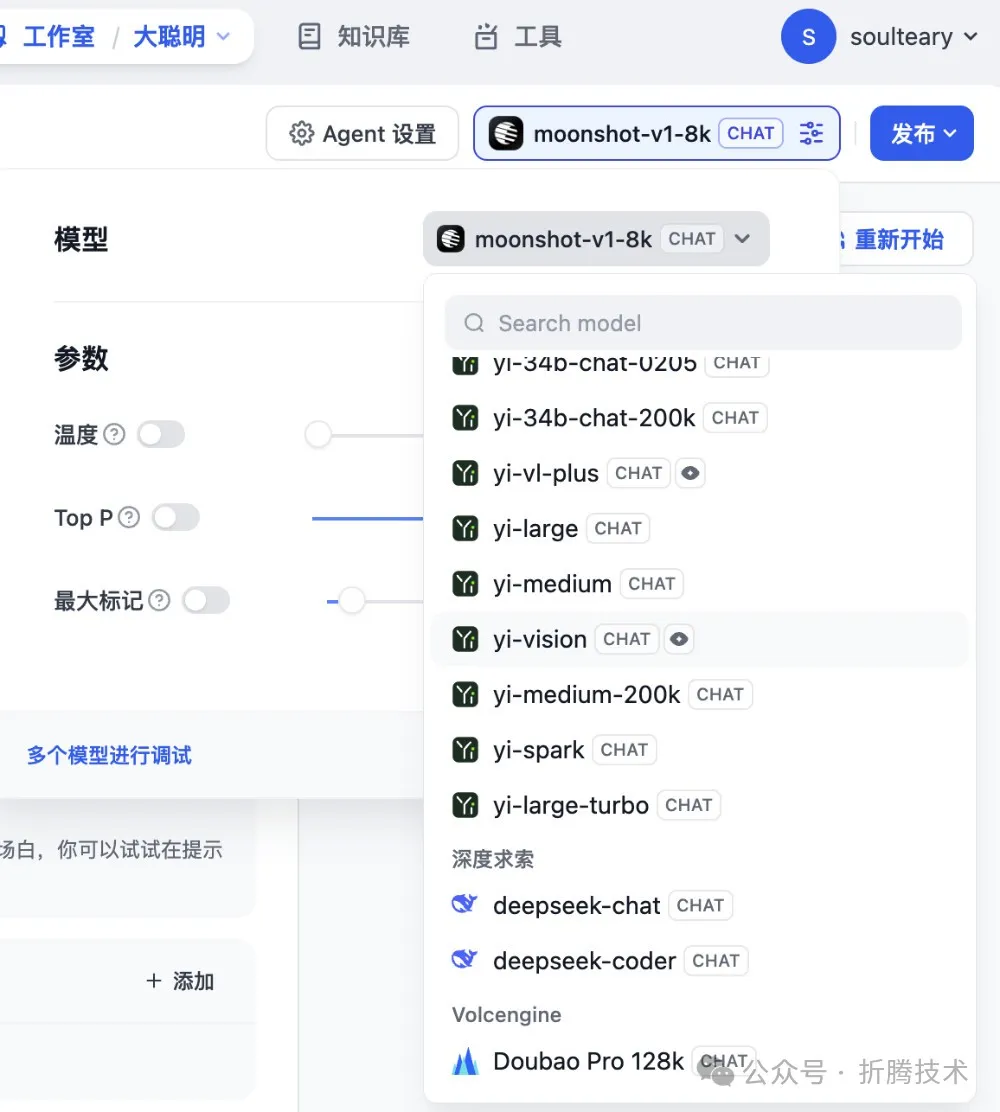
Select the model we want to use
Then adjust the model hyperparameters according to your needs:
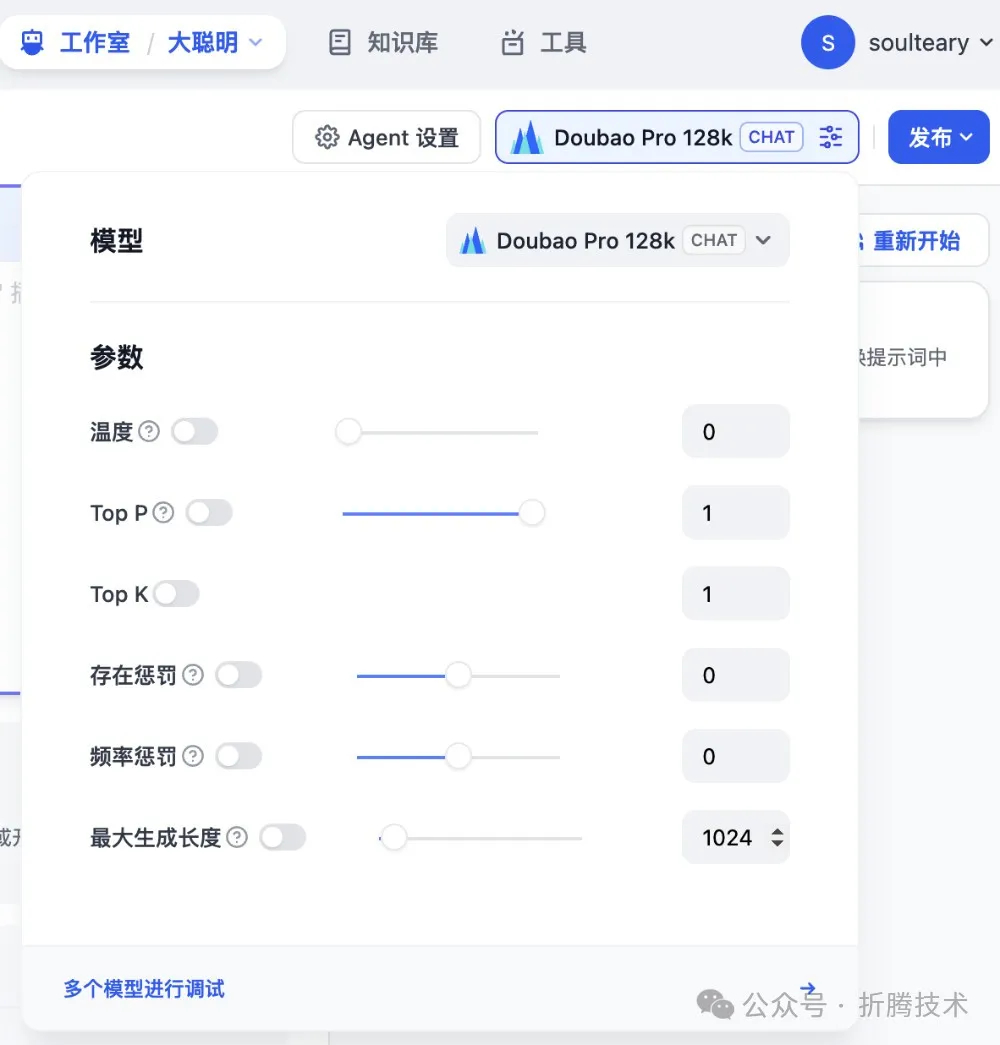
Update model parameters
Great, the basic Agent application is set up. Now let's enhance the Agent's capabilities by implementing tools that the Agent can call.
3
"Implementing Agent Tool APIs"
In the previous article, we walked through how to connect with existing system interfaces and retrieve data directly from a locally deployed search engine. We won't expand on that code here — we'll only cover what's relevant to this article.
Currently, since Dify's Agent functionality is still evolving, we can use a simpler method to define a Dify-compatible interface — roughly thirty lines or so (complete code available at soulteary/dify-with-ai-agent/dify/main.go [14], feel free to grab it):
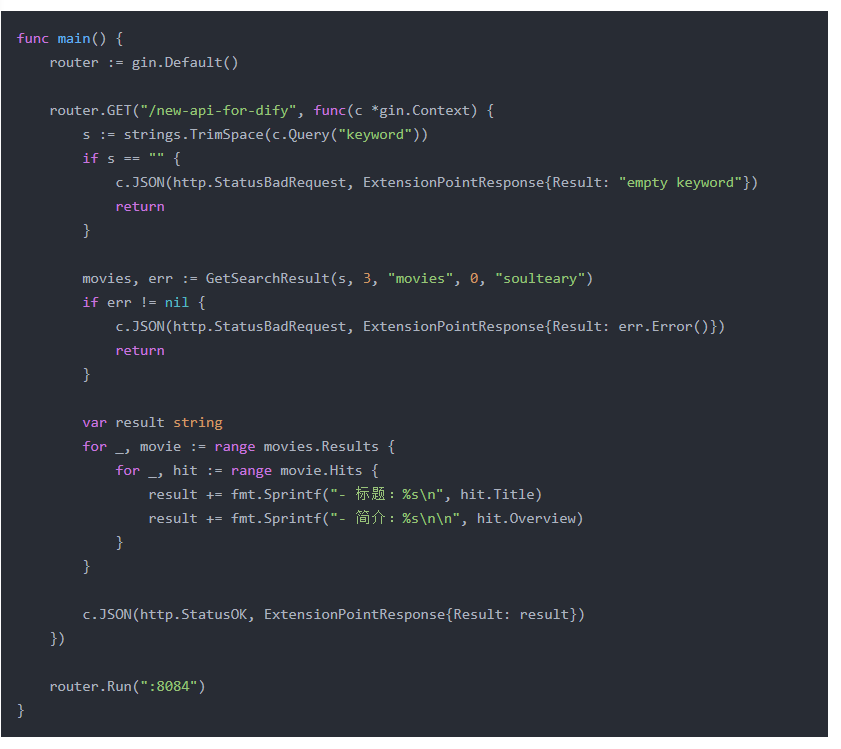
In the code above, we define a service running on port 8084. The main functional endpoint is /new-api-for-dify, which receives a keyword parameter from GET requests sent by the Dify Agent and passes it to the "movie data retrieval" function we already implemented in the previous article's "Step Five: Complete the AI Interface, Make the Program AI-Powered [15]" section.
Once you've completed the above program, run go run main.go and you'll have a new interface service running on port 8084 — we'll use this next.
You can wrap additional information retrieval or "action API" services based on your actual needs, for the Agent to call.
Once we've completed the above steps, we can refine the Dify AI Agent application we created earlier. From Dify's top menu, select "Tools," then click "Create Custom Tool" on the left side of the tools page.
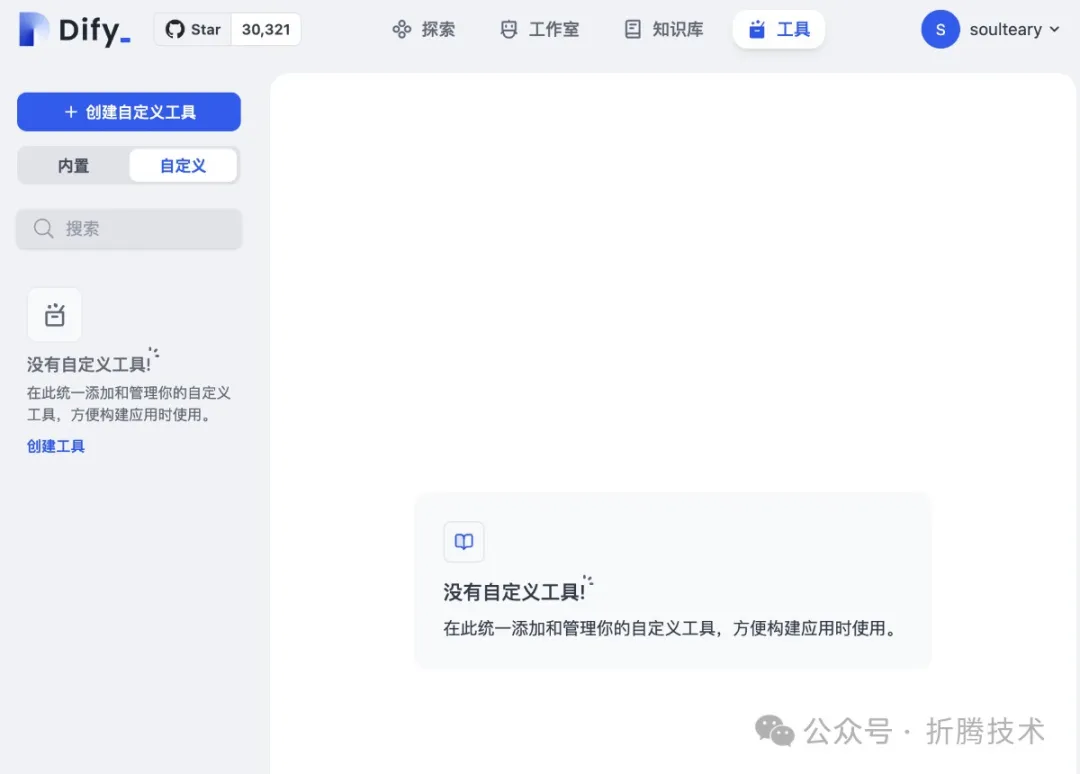
Create a new tool
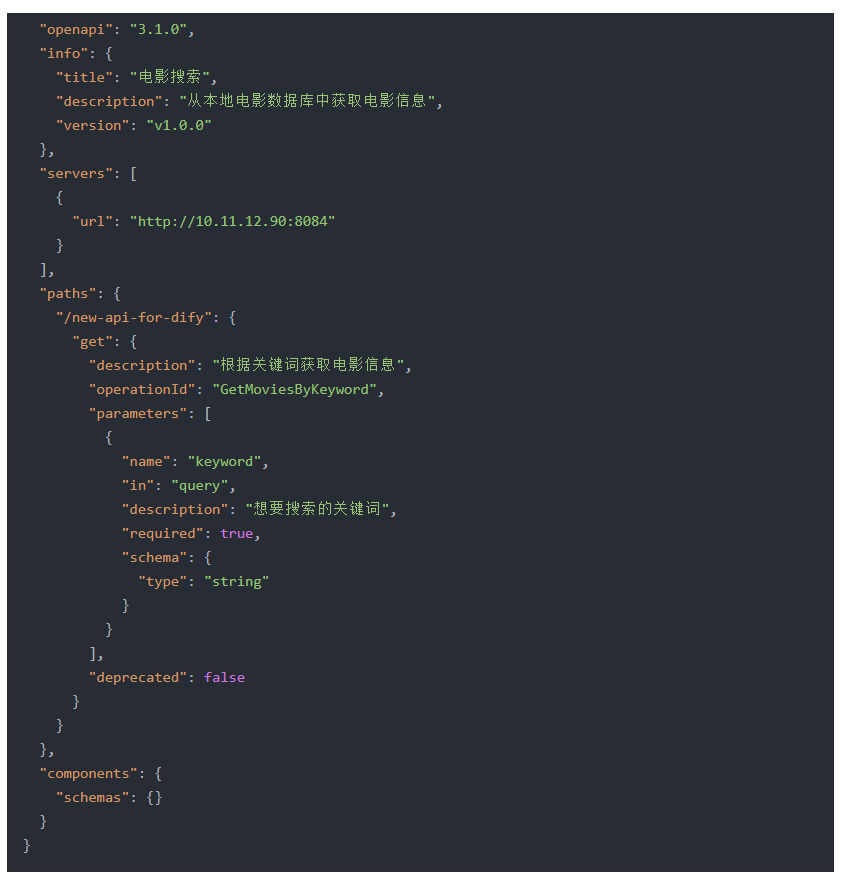
Combining the interface information we created above, fill in the appropriate configuration in the popup window to complete the tool creation. Referencing our implemented interface, you can easily create a JSON configuration:
Once we copy and paste the configuration into the popup window, the "Available Tools" section will show callable interfaces. We can click the "Test" button to verify the interface works.
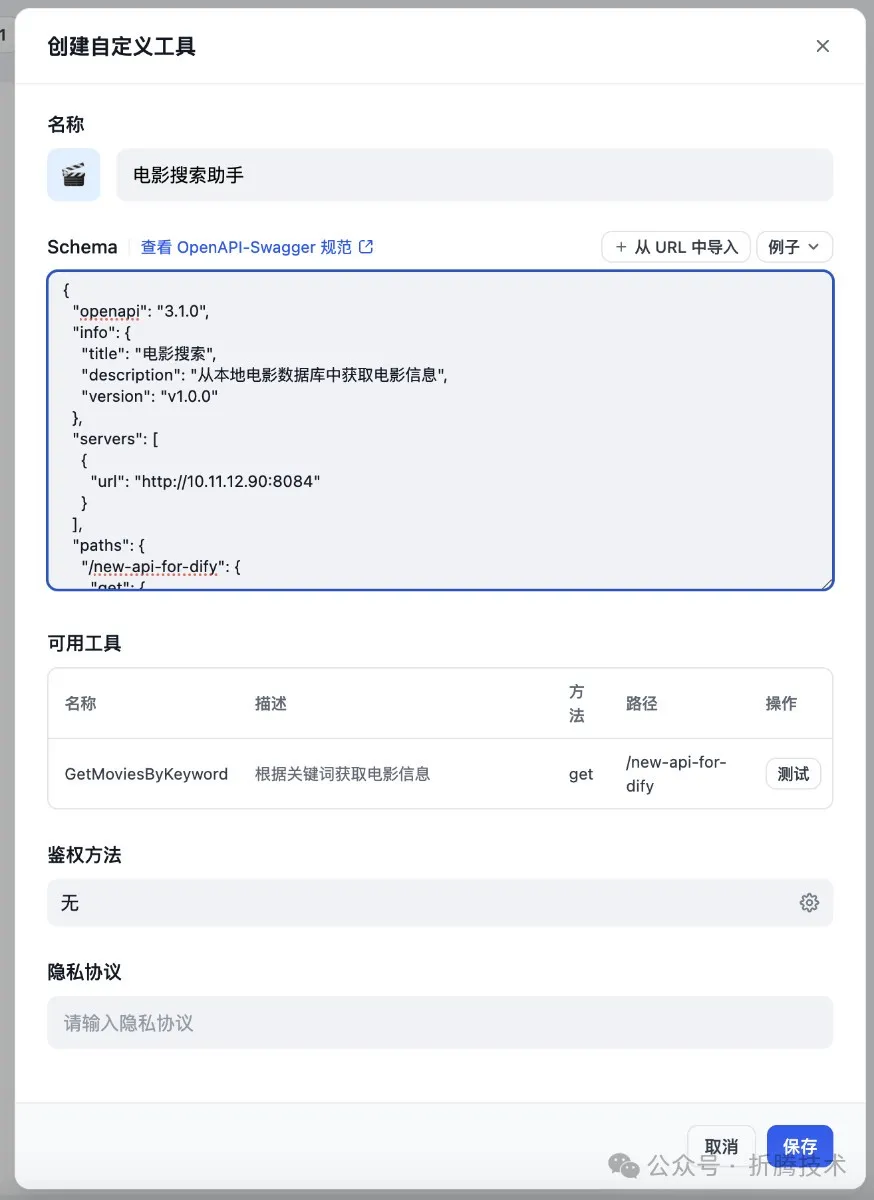
Fill in the tool's specific parameters
For example, if we enter "Titanic" in the popup window, we can clearly see whether the tool is working properly:
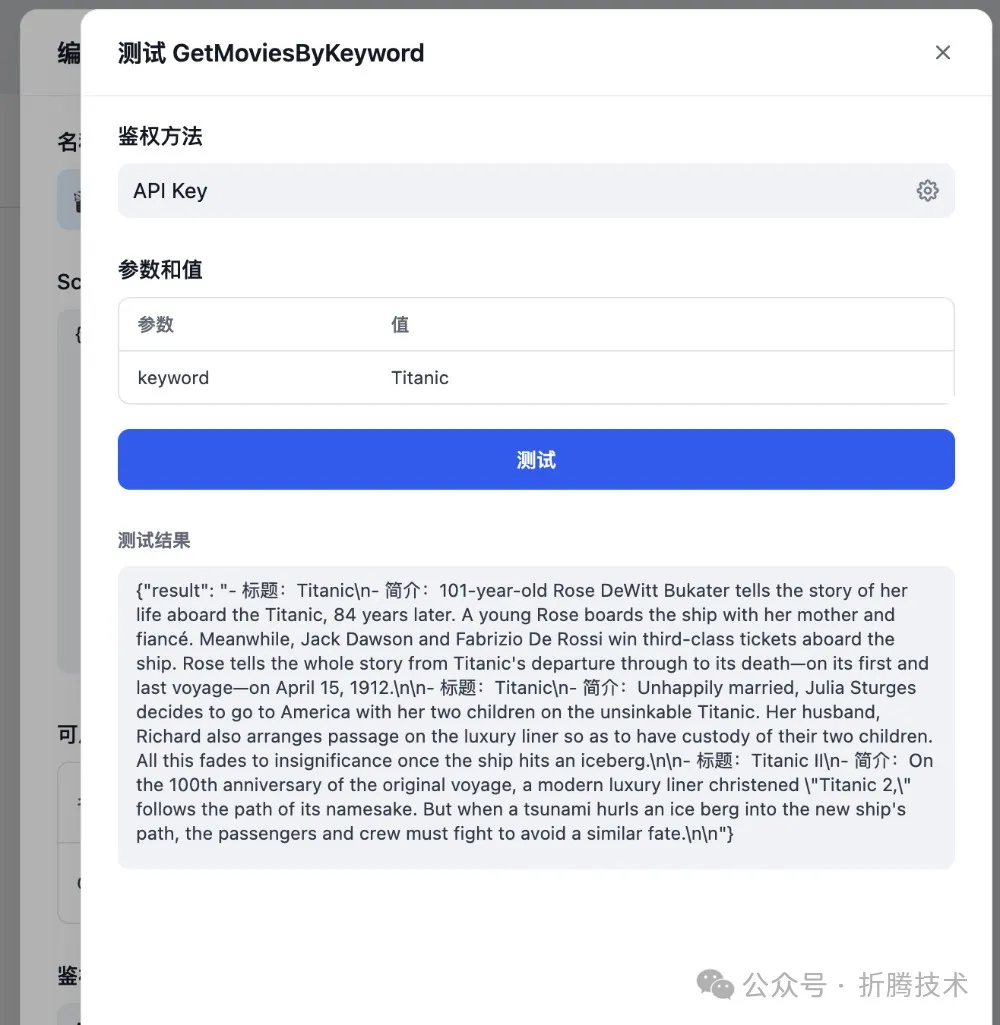
Fill in the tool's specific parameters
4
"Refining the Dify AI Agent Application"
Let's reopen the AI Agent application we built in Step 2 and start refining its implementation. First, we'll set up an appropriate prompt.
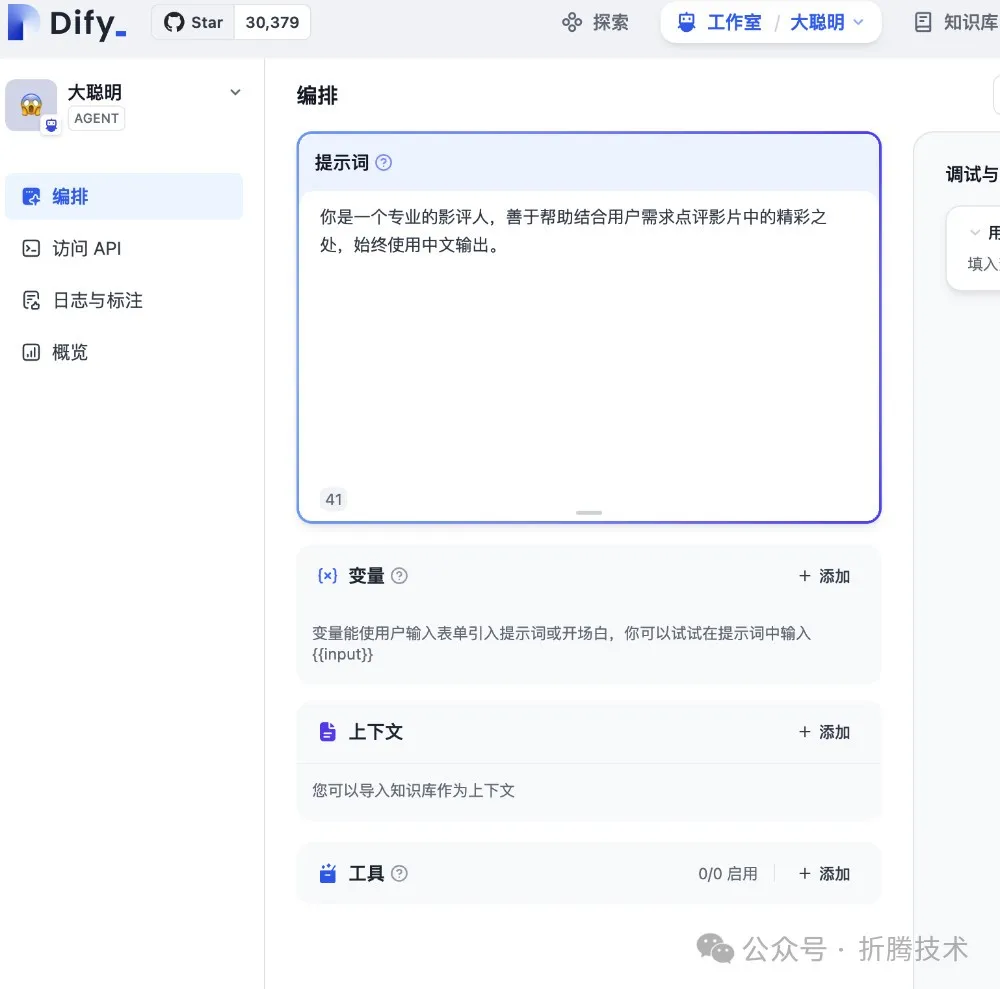
Update the Agent Prompt
Next, click "Add Tool" on the left side of the interface to add the "Movie Search" tool we just created.
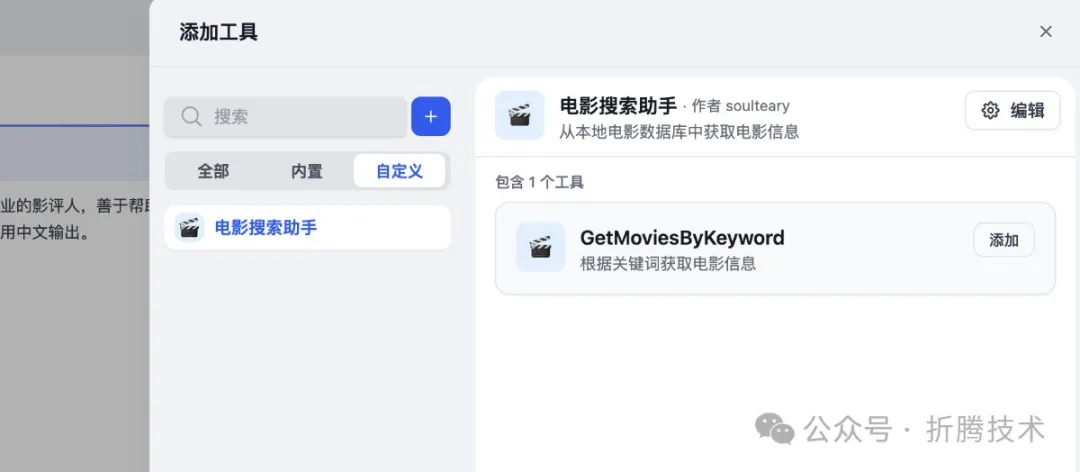
Add the new tool to the Agent
Since an Agent can call multiple tools, and considering the practicality of this demo, I've added two applications here: our self-built "Movie Search Assistant" and "Lark Group Message Sender."
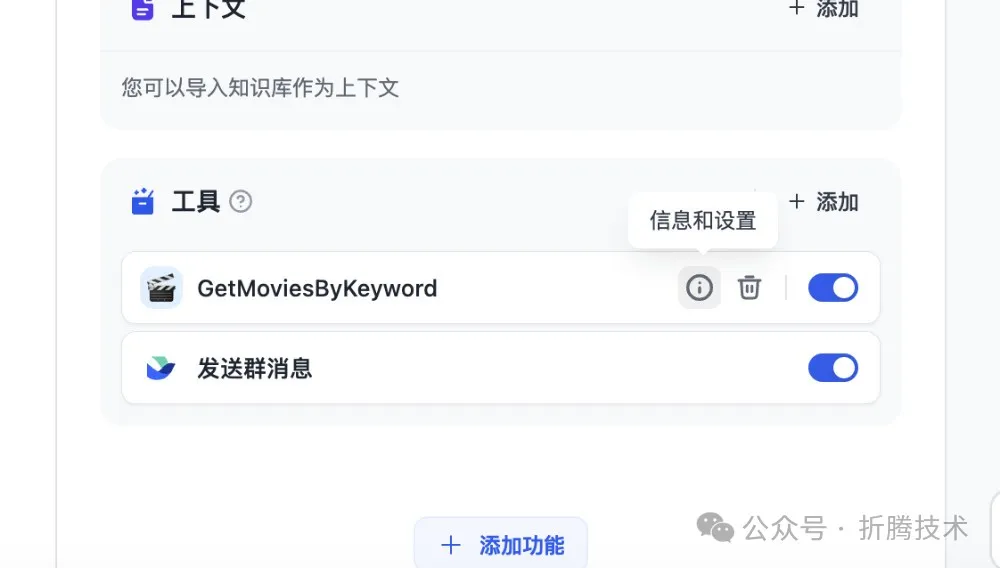
Add two new tools
For setting up and obtaining the WebHook Token required by the Lark notification tool, you can refer to the steps for "Setting Up Lark WebHook ([16])" mentioned in my previous article A Lightweight WebHook Tool: WebHook. The explanation there is quite detailed, so I won't repeat it here.
Verifying the Results
As with the previous article, we can search for specific movie titles, or keywords related to movie genres, plot summaries, etc. based on our needs. Here, I searched for "The Lion King" and asked the Agent to translate the English API results into Chinese and send them to my configured Lark group.
Of course, I'm lazy, so I just wrote one sentence for all of the above: "Search for Lion King, translate why the movie is worth watching into Chinese, and send the results to Lark."
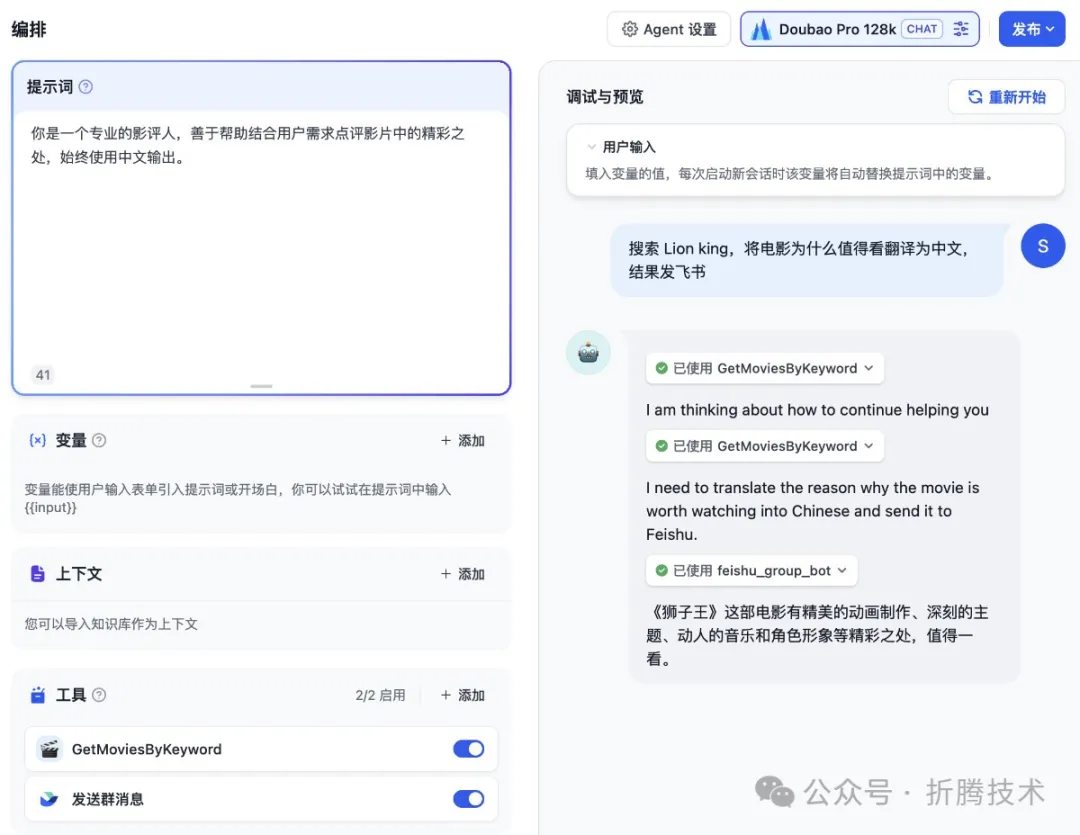
Casually search for a movie or keyword
In the interface above, we can see the model breaking down and analyzing what needs to be done step by step. Once it completes all tasks, our Lark group receives the distilled results.

Message received in Lark
When we hover over a conversation message, we can open the detailed message logs. On the left side of the interface, we can see all the call details, making it convenient to check why a particular step didn't meet expectations. Let's try another keyword that returns multiple results and verify again:
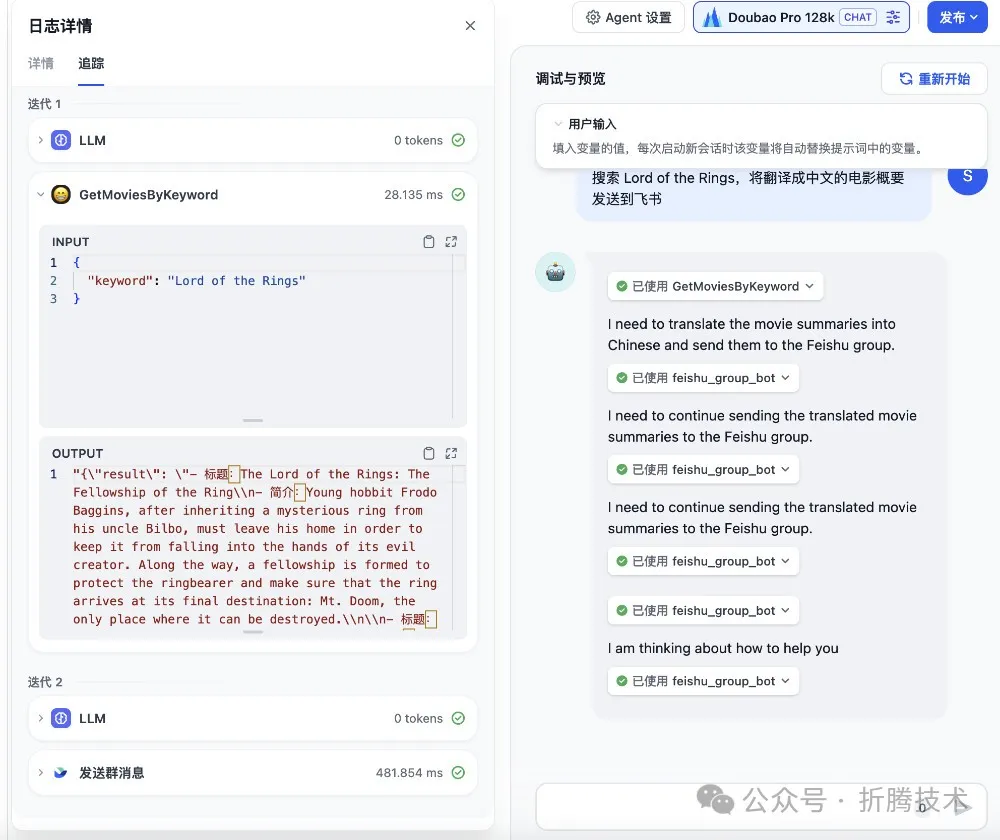
View the Agent's step-by-step execution logs
After the Agent completes its execution, we receive a new message:
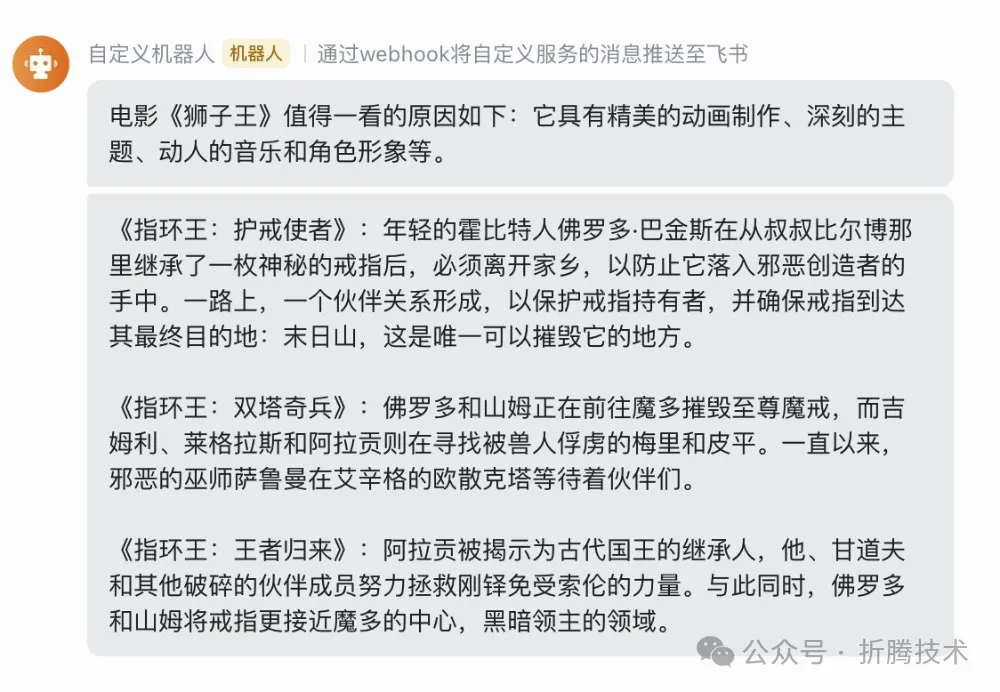
A new Lark message
Of course, if the model consistently fails to meet expectations, the best approach is to switch to a model that supports Function Call. The Doubao model we're currently using employs the ReACT approach in the Agent (ReAct: Synergizing Reasoning and Acting in Language Models ([17])), and you can also adjust the prompt to use language and structure that the model understands better. We'll explore these topics in future articles.
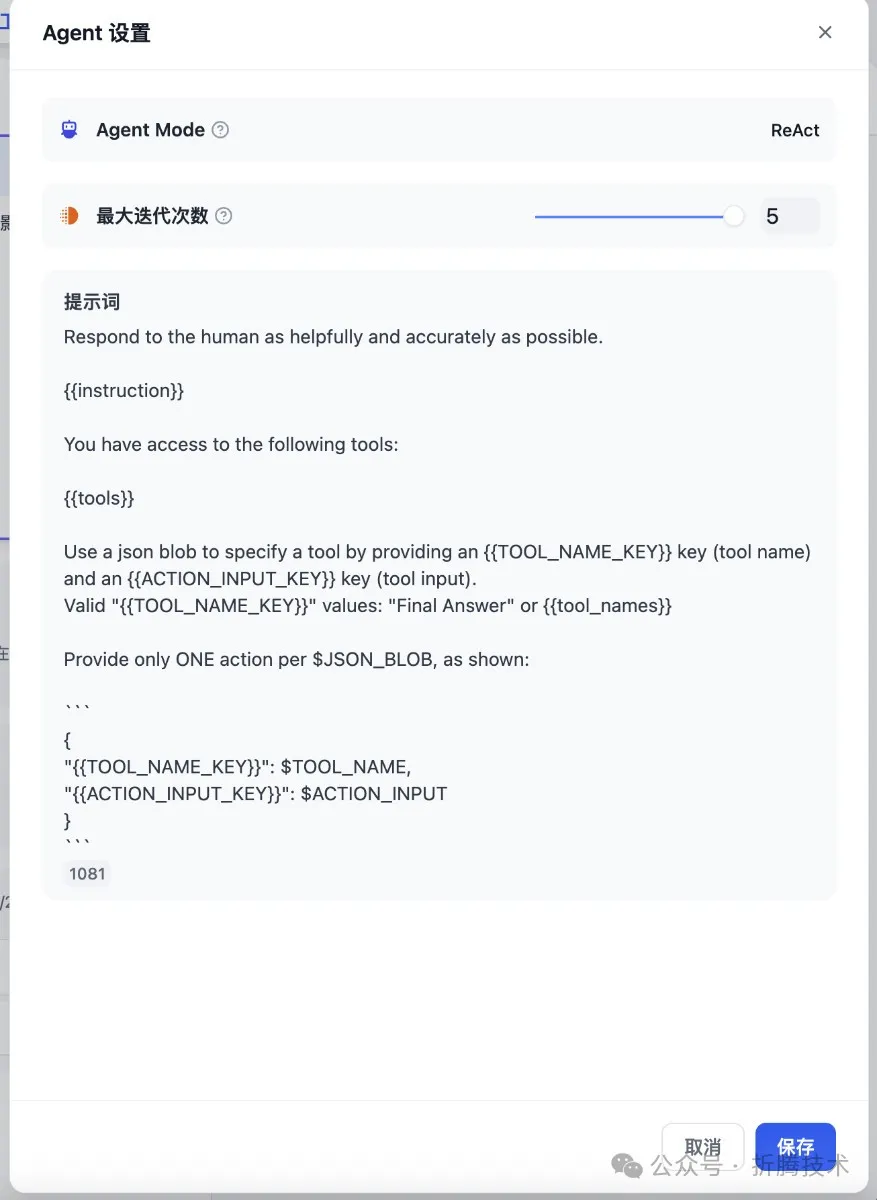
The Agent mode currently used by the model
Other Notes
There's plenty more interesting ground to cover regarding Volcano Engine and the Doubao model — low-cost SFT, using it for ETL, and more. I'll gather more material and write up some fun hands-on pieces.
Finally
That's all for this article. In the next related piece, we'll explore other detailed tricks and techniques.
Reference Links
[1] Building the Simplest RAG App with Dify, Meilisearch, and 01.AI (Part 3): AI Movie Recommendations: https://soulteary.com/2024/05/20/use-dify-with-meilisearch-and-01-ai-model-services-to-create-the-simplest-rag-application-ai-movie-recommendation.html [2] This issue is resolved: https://github.com/langgenius/dify/issues/3796 [3] soulteary/dify-with-ai-agent: https://github.com/soulteary/dify-with-ai-agent [4] Docker-Based Deep Learning Environment: Windows Edition: https://soulteary.com/2023/07/29/docker-based-deep-learning-environment-under-windows.html [5] Docker-Based Deep Learning Environment: Getting Started: https://soulteary.com/2023/03/22/docker-based-deep-learning-environment-getting-started.html [6] Dozens of Docker Practice Articles: https://soulteary.com/tags/docker.html [7] Quick Dify Setup and Launch: https://soulteary.com/2024/03/18/play-with-anthropopic-claude-3-using-dify-and-aws-bedrock.html#%E5%BF%AB%E9%80%9F%E5%AE%8C%E6%88%90-dify-%E7%9A%84%E9%85%8D%E7%BD%AE%E5%92%8C%E5%90%AF%E5%8A%A8 [8] Optimized Dify Docker Configuration: https://soulteary.com/2024/04/24/use-dify-and-moonshot-api-to-build-your-ai-workflow-make-non-ai-applications-goto-ai.html#%E4%BC%98%E5%8C%96-dify-%E9%A1%B9%E7%9B%AE%E9%85%8D%E7%BD%AE [9] ML MaaS Cloud Console: https://console.volcengine.com/ml-maas/ [10] Volcano Ark 2.0 ARK Cloud Console: https://console.volcengine.com/ark/ [11] Key Management: https://console.volcengine.com/iam/keymanage/ [12] Volcano Ark 2.0 Model Inference Page: https://console.volcengine.com/ark/region:ark+cn-beijing/endpoint [13] Volcano Ark 2.0 Model Experience Interface: https://console.volcengine.com/ark/region:ark+cn-beijing/experience [14] soulteary/dify-with-ai-agent/dify/main.go: https://github.com/soulteary/dify-with-ai-agent/blob/main/dify/main.go [15] Step Five: Complete the AI Interface and Make Your Program AI-Powered: https://soulteary.com/2024/05/20/use-dify-with-meilisearch-and-01-ai-model-services-to-create-the-simplest-rag-application-ai-movie-recommendation.html#%E6%AD%A5%E9%AA%A4%E4%BA%94%E5%AE%8C%E6%88%90-ai-%E6%8E%A5%E5%8F%A3%E8%AE%A9%E7%A8%8B%E5%BA%8F-ai-%E8%B5%B7%E6%9D%A5 [16] Setting Up Lark WebHook: https://soulteary.com/2024/04/06/lightweight-webhook-tool.html#%E8%AE%BE%E7%BD%AE%E9%A3%9E%E4%B9%A6%E7%9A%84-webhook-%E5%8A%9F%E8%83%BD [17] ReAct: Synergizing Reasoning and Acting in Language Models: https://research.google/blog/react-synergizing-reasoning-and-acting-in-language-models/